How to Enable 2FA on Gmail — Step by Step (The Right Way)
A friend of mine got his Gmail hacked at 2am. Password reset on Instagram, Amazon, almost his bank — three days of chaos. If he'd had 2FA enabled, none of it would have happened. Here's exactly how to set it up.
First, Let Me Tell You Why This Actually Matters
A few months ago, a friend of mine got a panic call at 2am. Someone had gotten into his Gmail. Not just read his emails — they'd used it to reset his Instagram, his Amazon account, and tried to get into his bank. He spent three days sorting it out. Three days of stress, calls to customer support, and changing passwords everywhere.
His password was "strong" by most standards. Mixed case, numbers, a symbol. Didn't matter. It had shown up in a data breach from some website he'd signed up for years ago and forgotten about.
If he'd had 2FA on Gmail, the attacker would have gotten nowhere. Password or not, they'd have been stopped cold at the second step.
That's what this guide is about. Not theory — just the actual steps to get 2FA turned on for your Gmail account today, in about 5 minutes.
What Even Is 2FA? (Quick Version)
Two-factor authentication means logging in requires two things: something you know (your password) and something you have (your phone). Even if someone steals your password, they still can't get in without physically having your device.
For Gmail, the most secure way to do this is with an authenticator app — a free app that generates a new 6-digit code every 30 seconds. You enter that code when you log in, and that's it. The whole thing adds maybe 10 seconds to your login process.
Worth it? Absolutely.
What You Need Before Starting
Two things:
Your phone (Android or iPhone — doesn't matter)
An authenticator app — Google Authenticator is fine, Authy works too. Both are free. Download one before you start.
Alternatively, if you're on desktop and want to skip the app entirely, 2FA.AC lets you generate TOTP codes directly in your browser — useful for testing or if you're setting things up on a work computer without your phone nearby.
Step 1 — Open Your Google Account
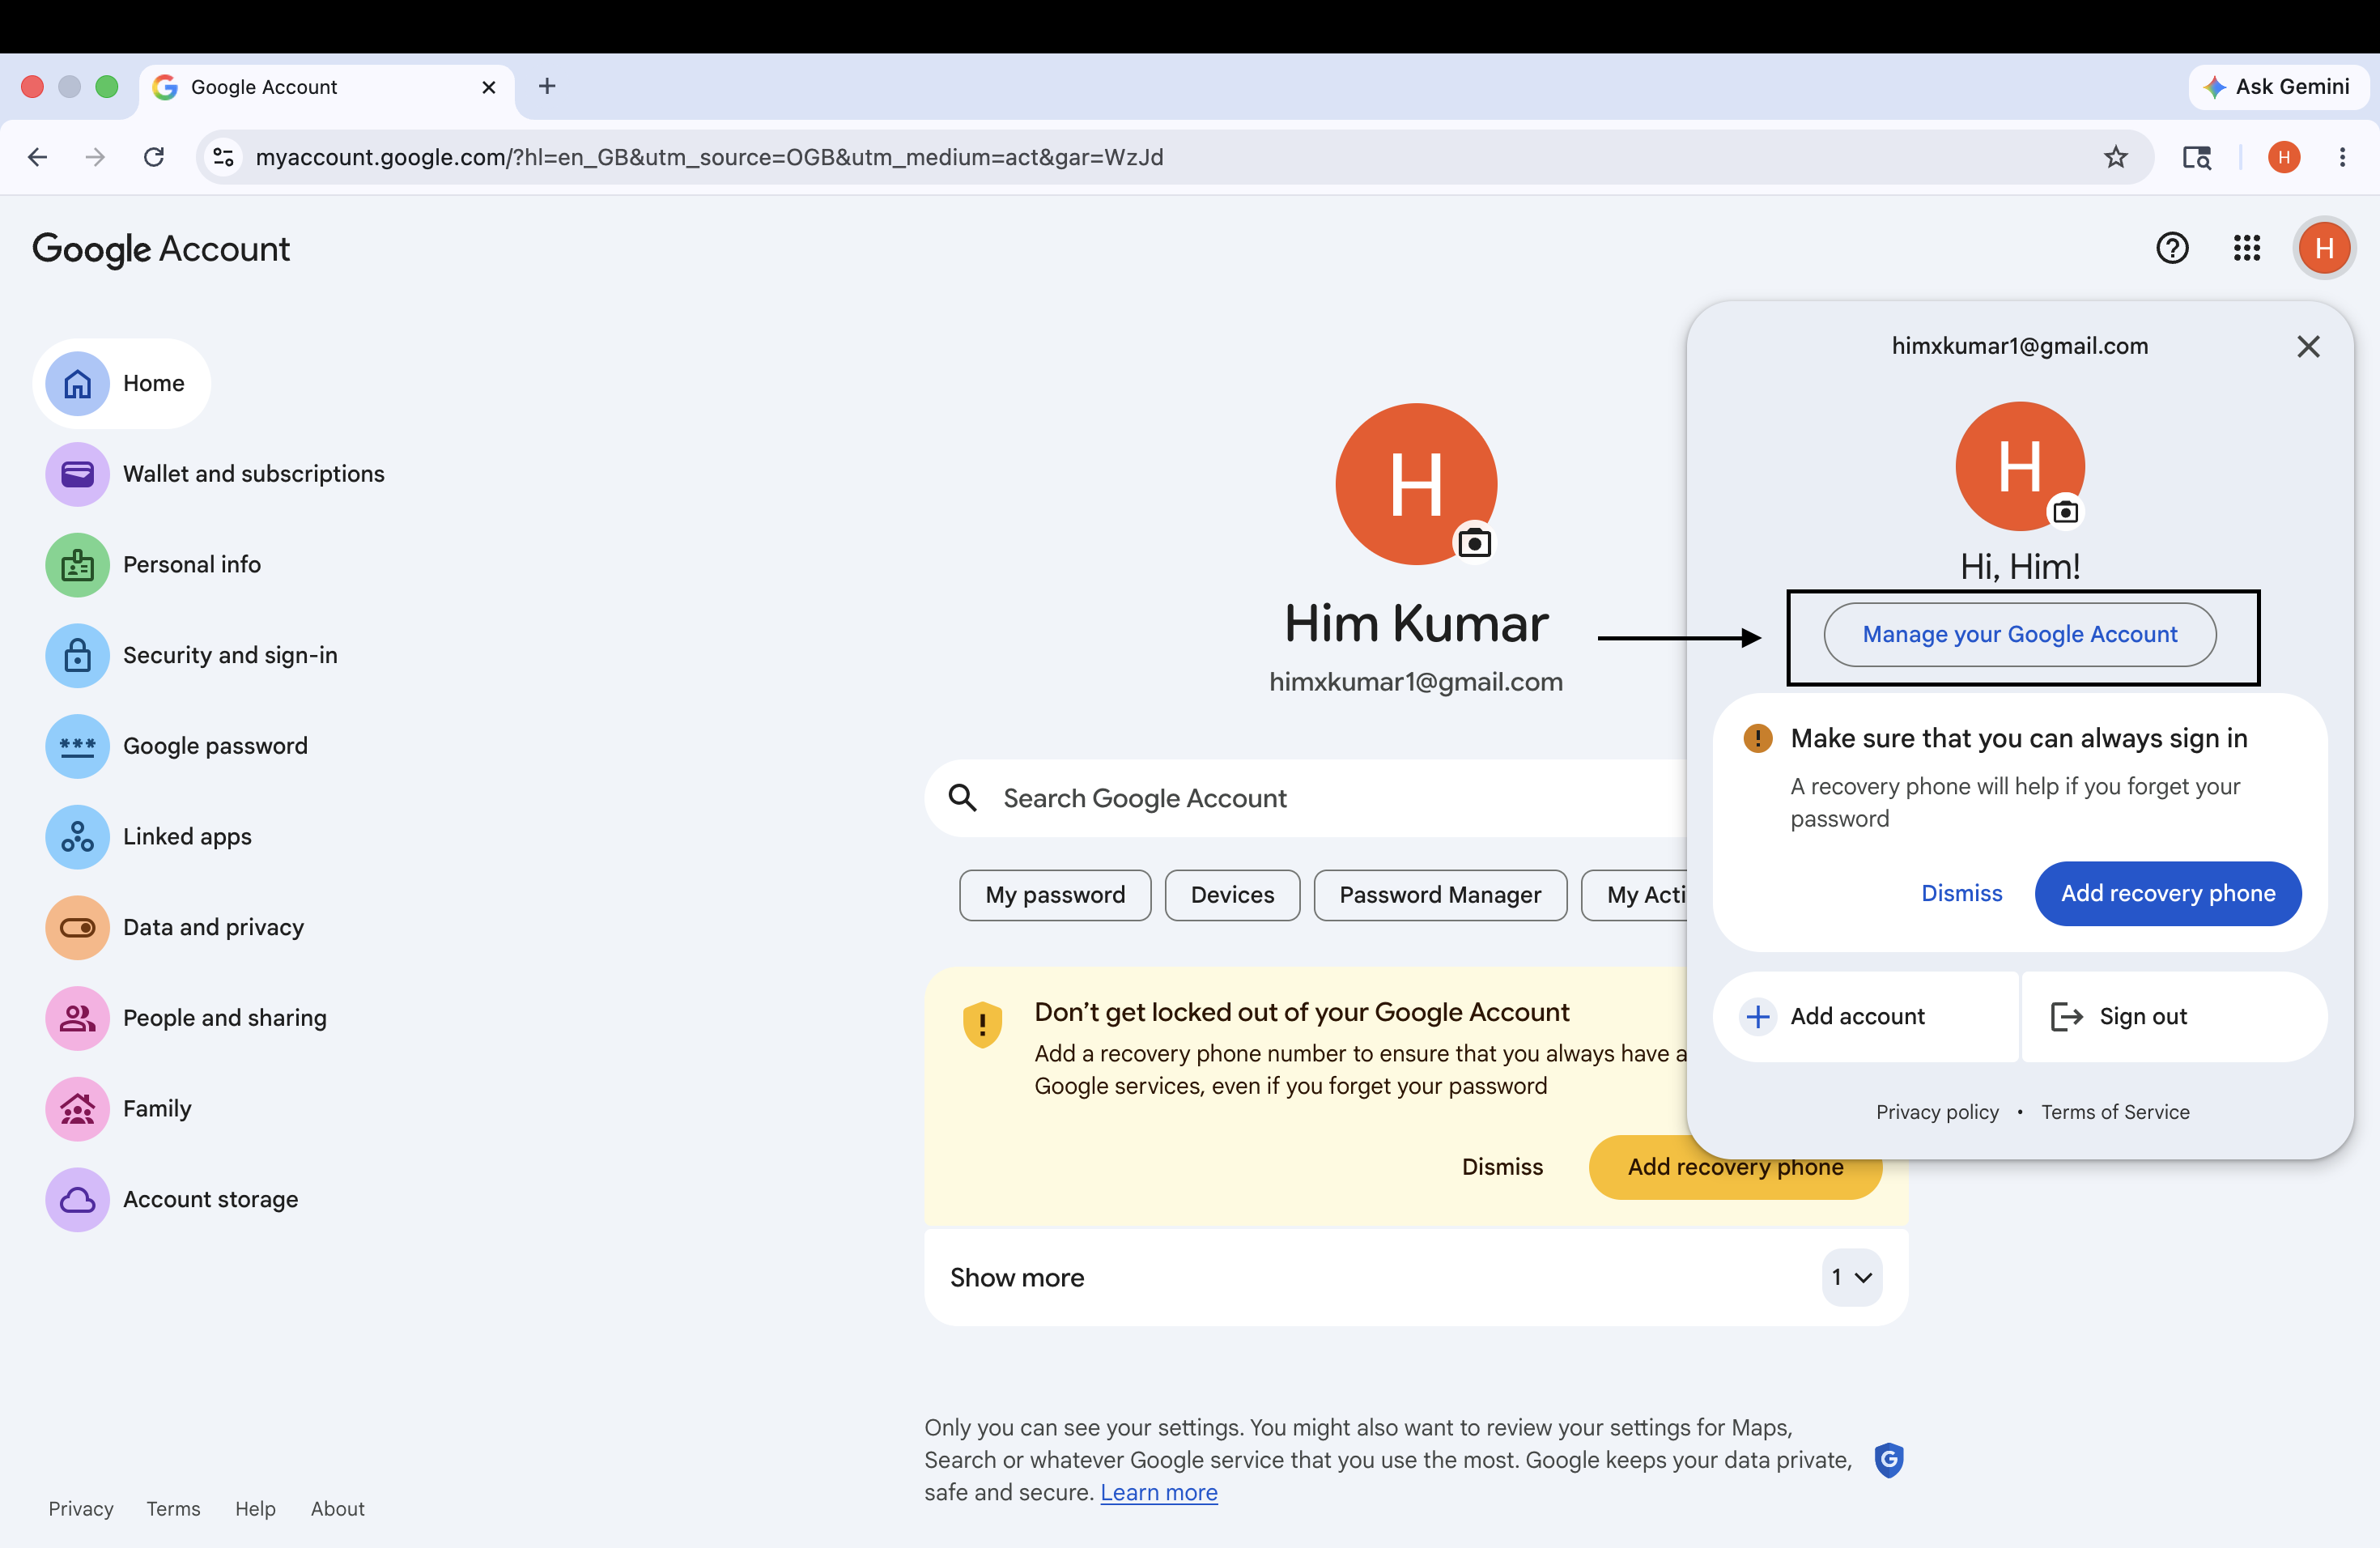
Go to myaccount.google.com. You can also get there from Gmail by clicking your profile photo in the top right corner and selecting "Manage your Google Account."
Make sure you're signed into the right account if you have multiple Gmail addresses.
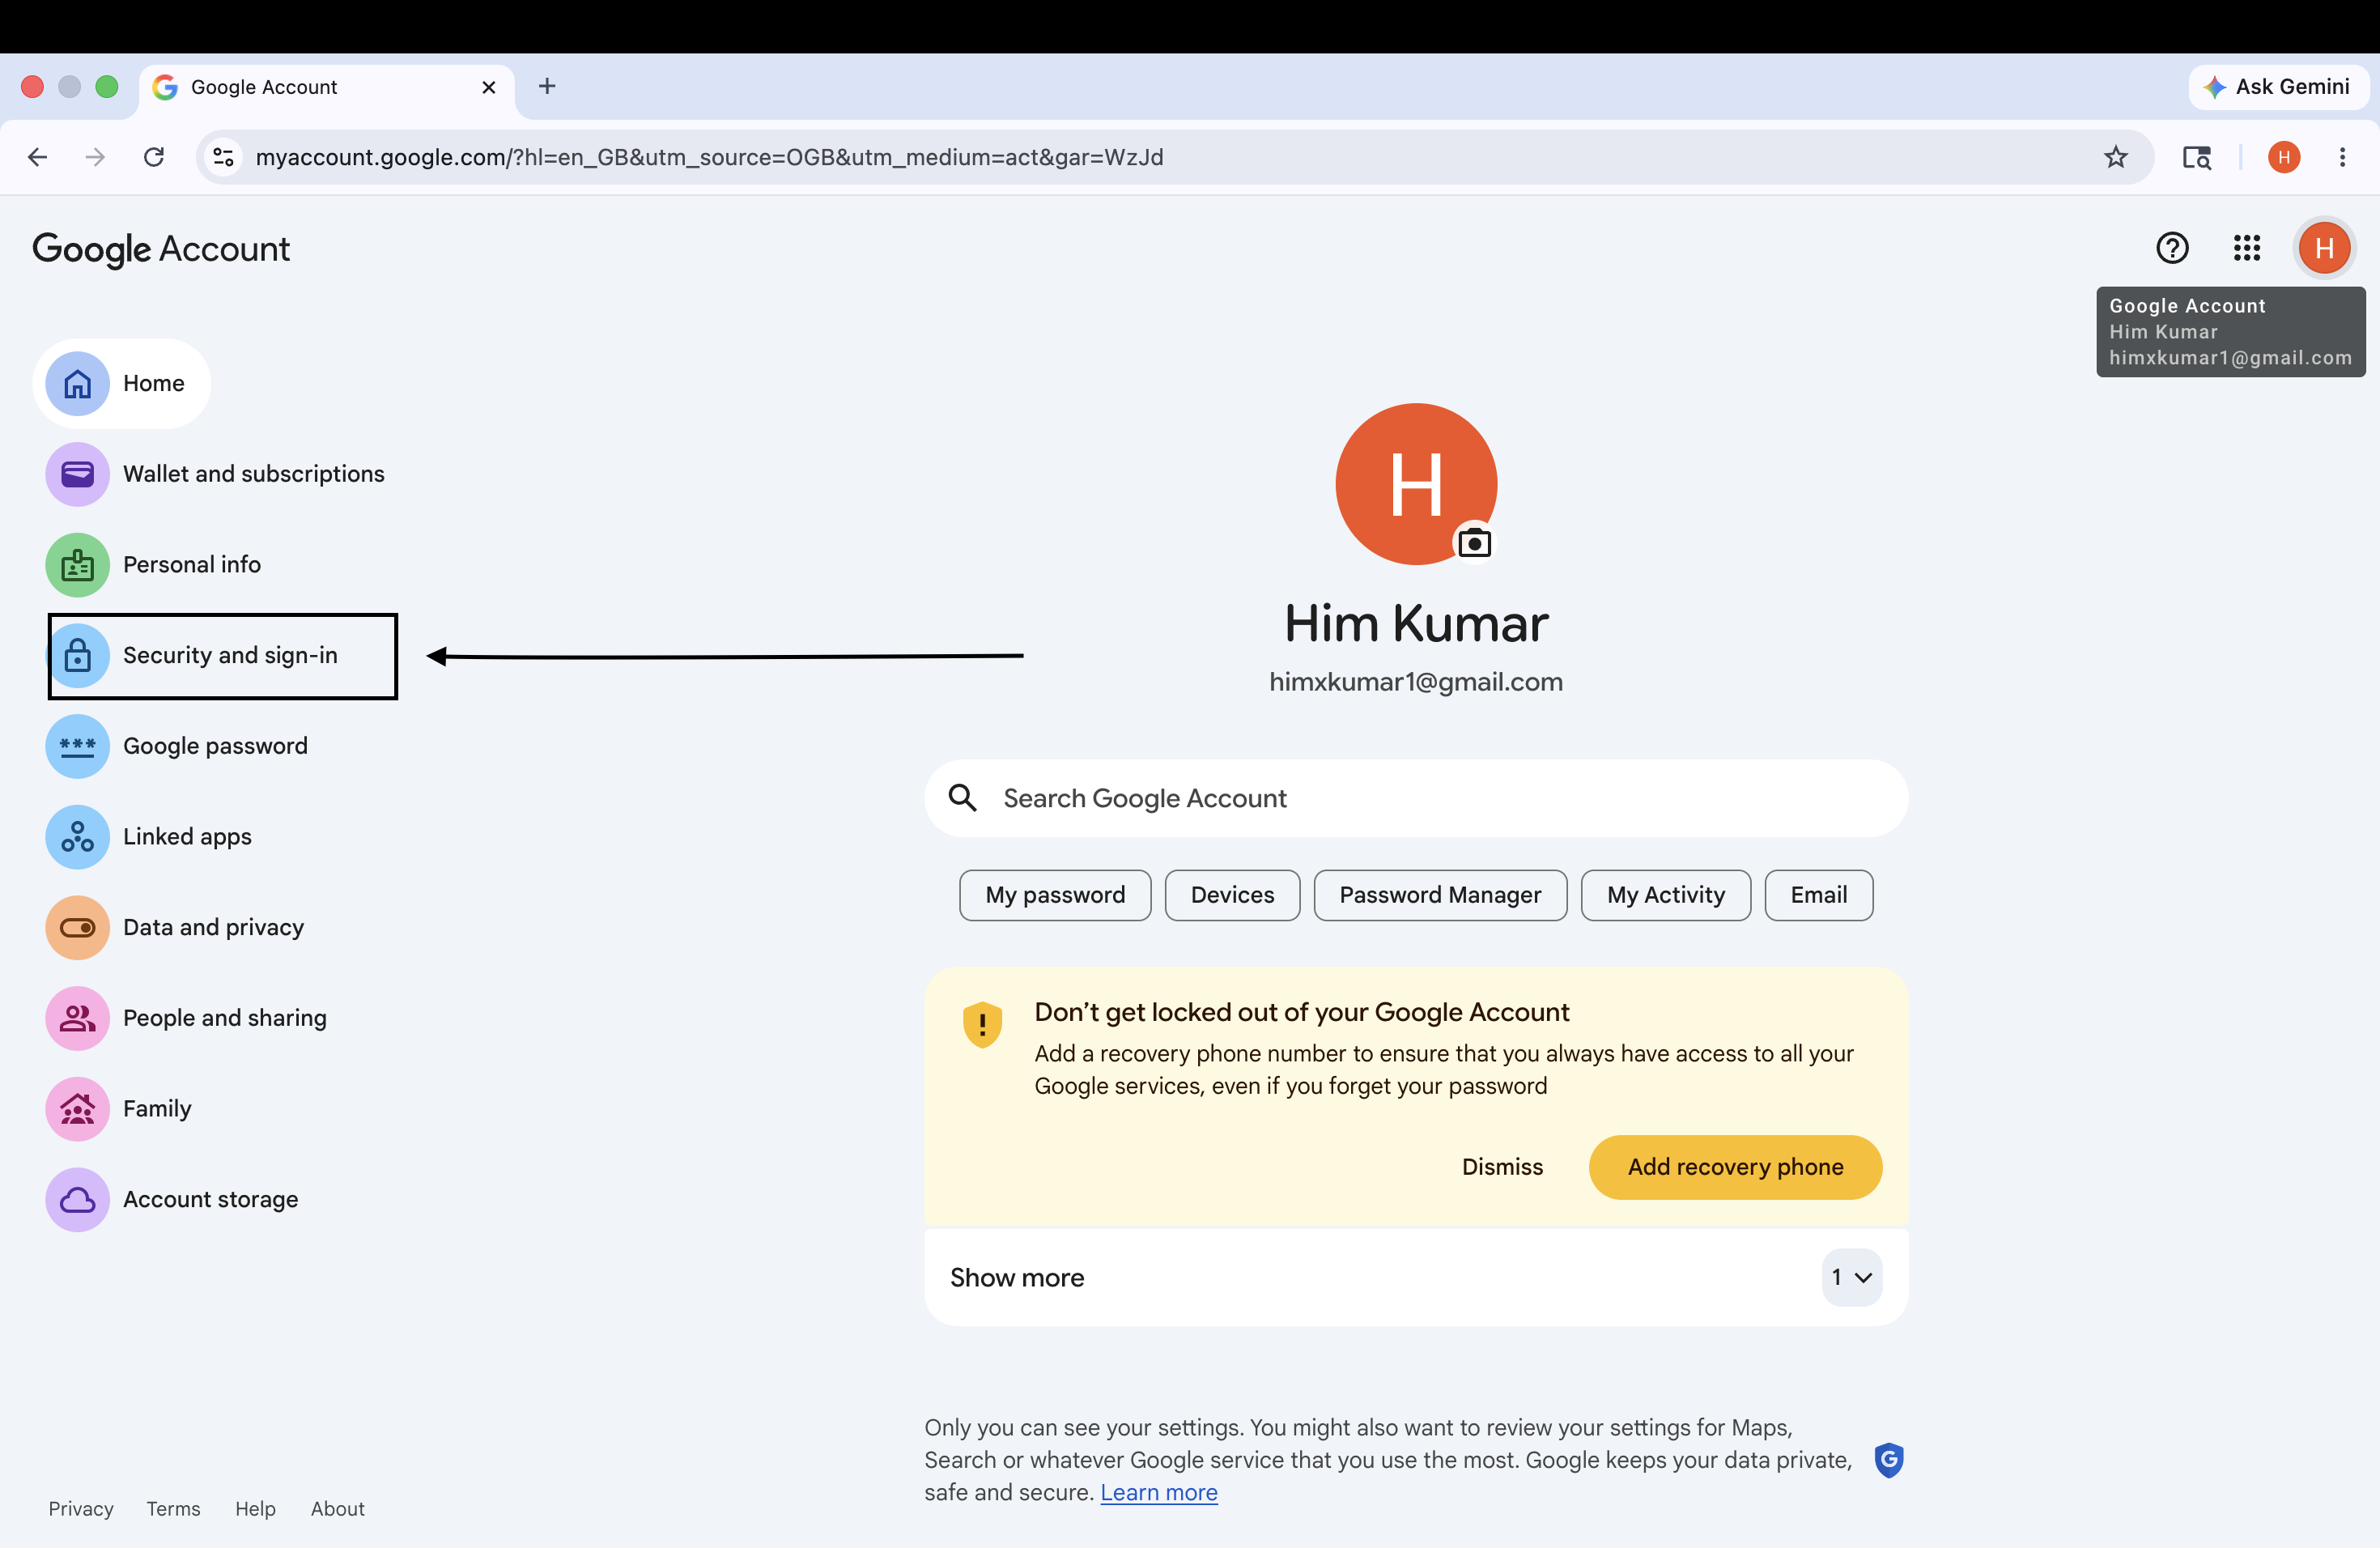
Step 2 — Head to Security
In the left sidebar, click Security. This is where Google keeps all the settings related to how you sign in and how your account is protected.
Take a moment to look at this page — it shows you recent sign-in activity, connected devices, and any security recommendations Google has for your account. Worth a quick scan.
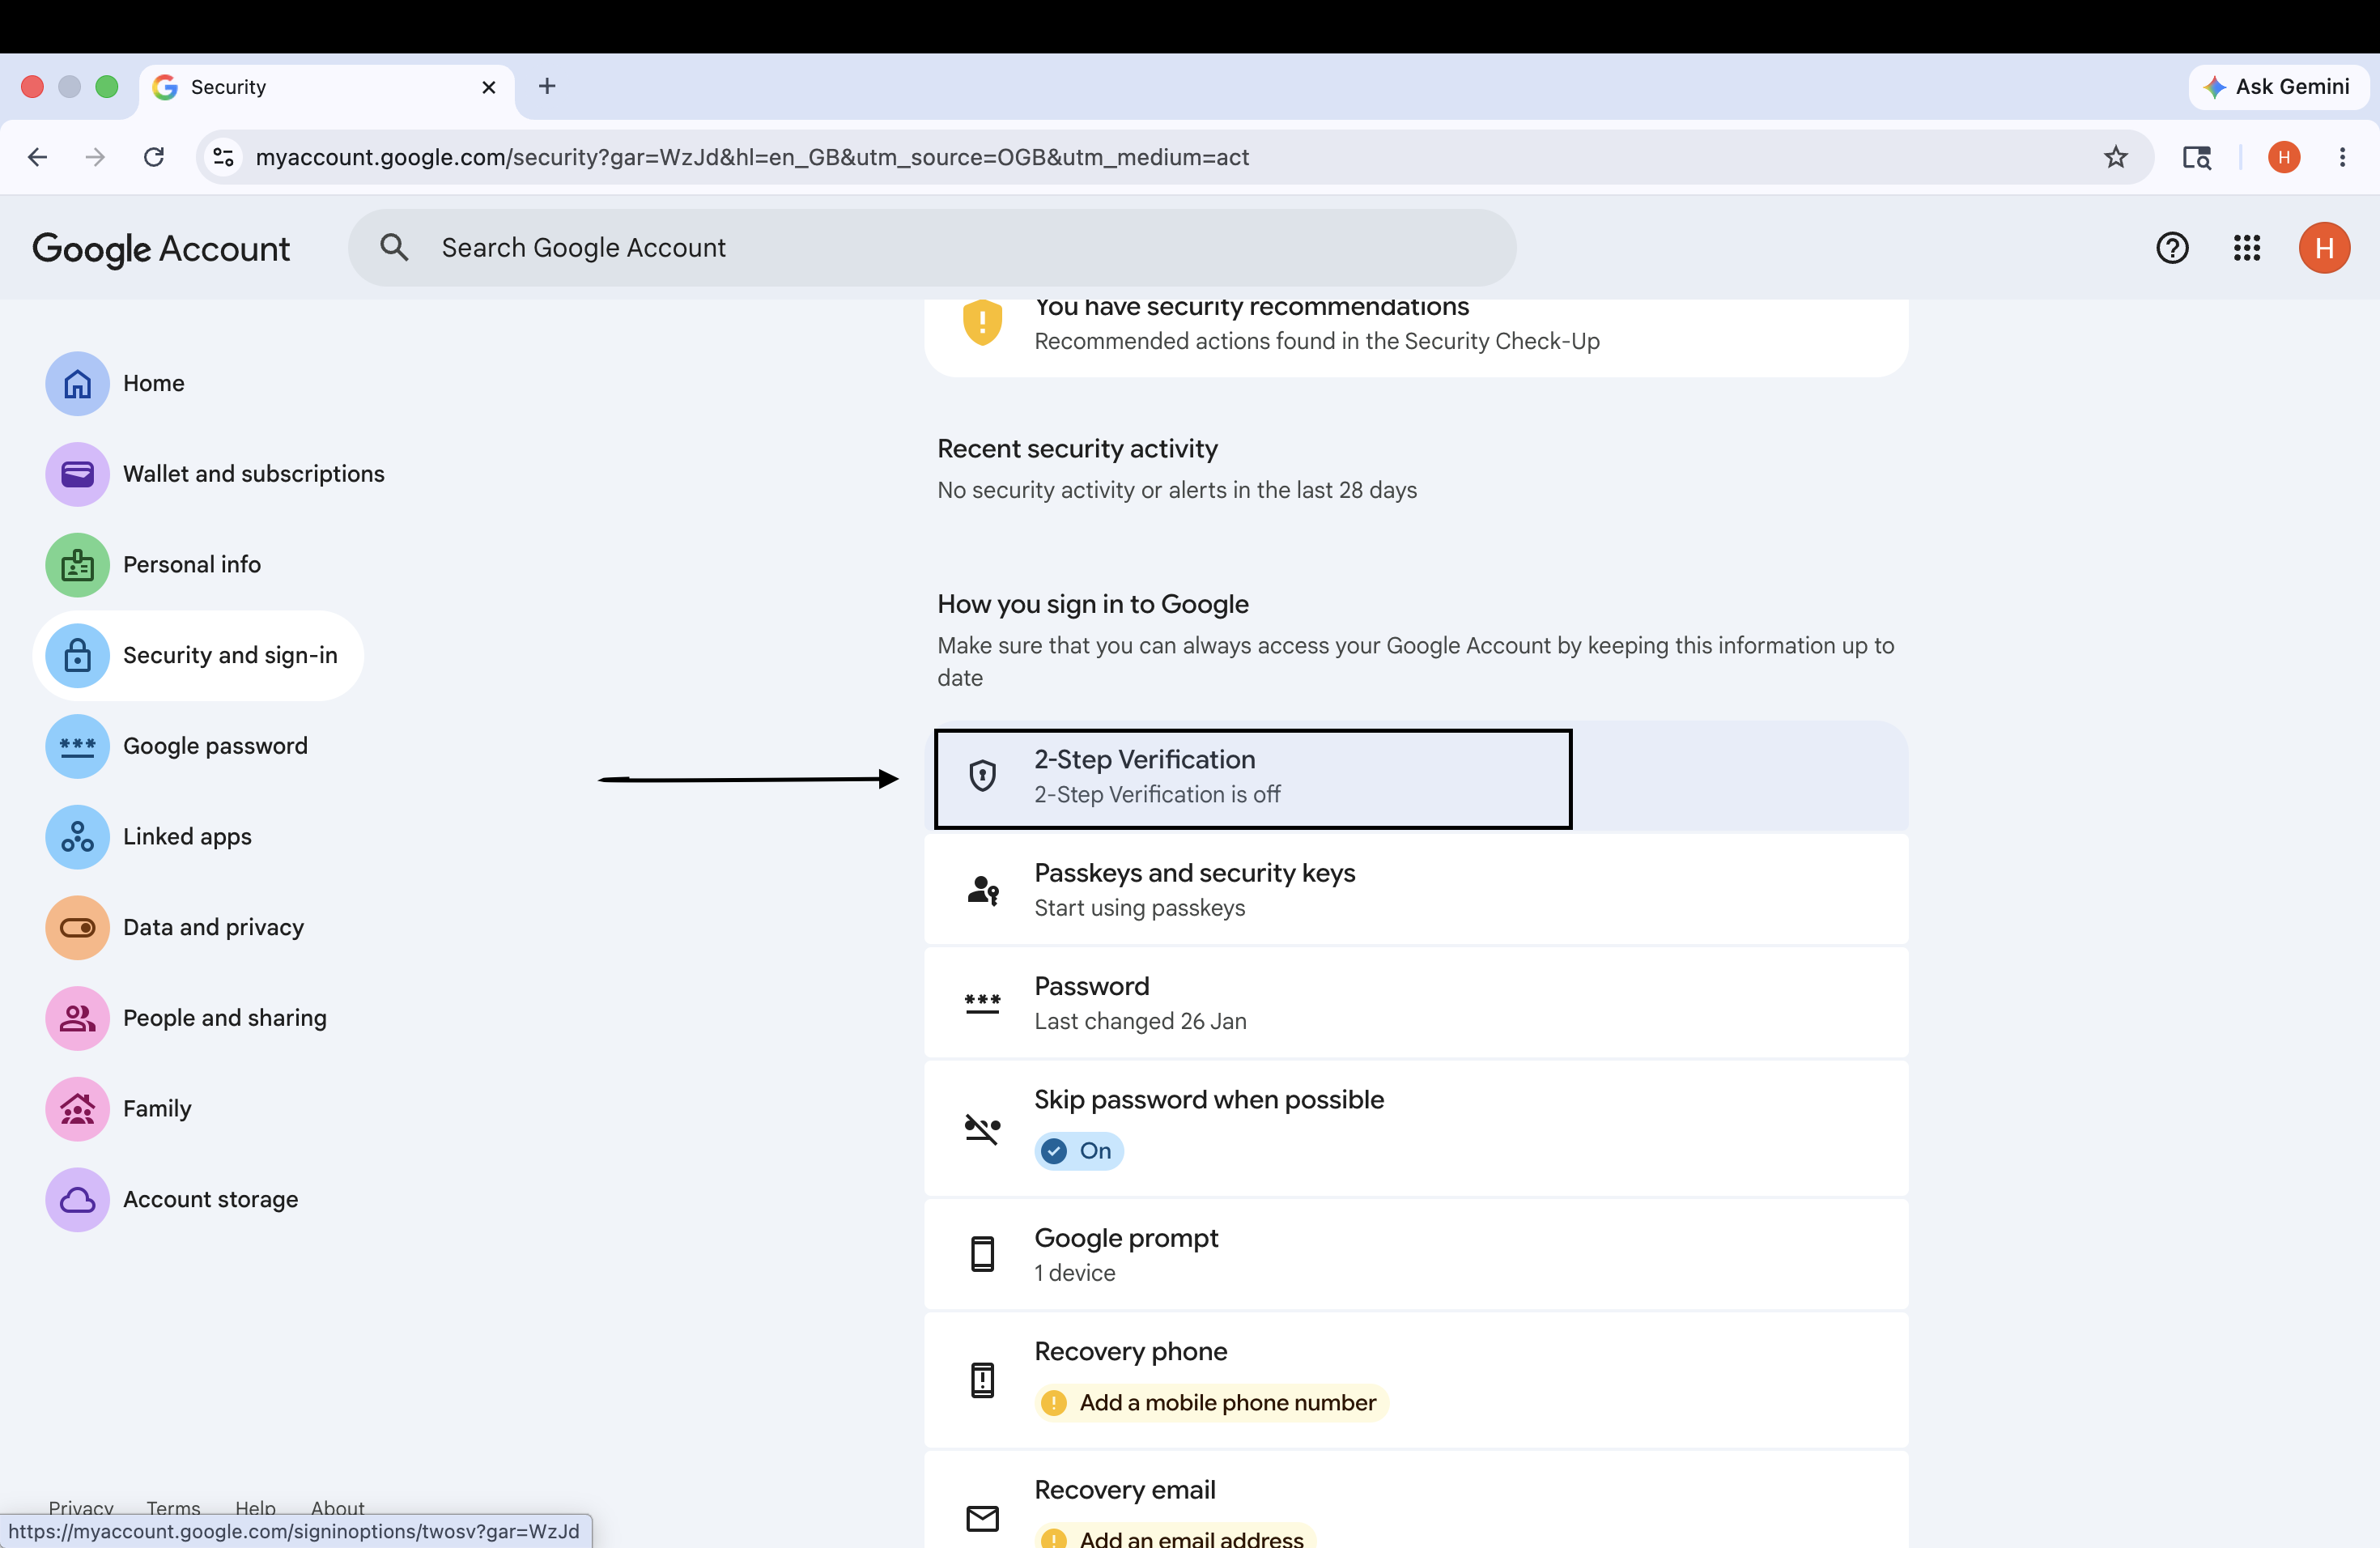
Step 3 — Find "2-Step Verification"
Scroll down until you see a section called "How you sign in to Google." Inside it, you'll see 2-Step Verification. If it says "Off," that's what we're fixing.
Click on it.
Step 4 — Click "Get Started" and Verify Your Identity
Google will show you a brief explanation of what 2-Step Verification does. Click Get started.
Google will probably ask you to re-enter your password here. This is just Google confirming it's actually you making this change — not someone who left your laptop open. Enter your password and continue.
Step 5 — Choose "Authenticator App"
Google will offer a few options. The main ones are:
Google prompts — A notification pops up on your phone, you tap yes
Authenticator app — You open an app and type in a 6-digit code
SMS text message — Google texts you a code
My recommendation: go with Authenticator app. It's more secure than SMS (which can be intercepted) and more reliable than Google prompts (which need an internet connection). It also works if you switch phone numbers or travel internationally.
SMS is better than nothing, but if you're going through the effort of setting up 2FA, do it properly.

Step 6 — Scan the QR Code
Google will display a QR code on your screen.
Open Google Authenticator on your phone → tap the + button at the bottom → tap "Scan a QR code" → point your camera at the QR code on your screen.
The app will add your Gmail account automatically and immediately start generating codes. You'll see something like "Google (your.email@gmail.com)" with a 6-digit number underneath it that counts down every 30 seconds.
If you can't scan the QR code for some reason — say you're setting this up on a phone that won't focus on the screen — click "Can't scan it?" on Google's page. You'll get a text code you can type manually into the app instead.
Step 7 — Enter the Code and Verify
Look at your authenticator app. You'll see a 6-digit code. Type it into the box on Google's website and click Verify.
One thing to watch: codes expire every 30 seconds. If you see the countdown is at 1 or 2 seconds, just wait for the next code rather than rushing. Expired codes won't work and it's confusing when you're not expecting it.
Step 8 — Turn It On
Google will confirm the setup worked and show you a "Turn on 2-Step Verification" button. Click it.
Done. Your account is now significantly harder to break into.
Step 9 — Save Your Backup Codes (Don't Skip This)
After enabling 2FA, Google will generate 10 backup codes for you. These are single-use codes you can use to get into your account if you ever lose your phone, break it, or otherwise lose access to your authenticator app.
Save these somewhere safe. Options:
Print them out and keep them somewhere physical
Store them in a password manager
Save them in an encrypted note
Do not save them in Gmail (that's circular) or in an unencrypted Google Doc. The whole point is to have access when your normal login methods fail.
Skipping this step is the number one reason people get locked out of their accounts after enabling 2FA. Takes 30 seconds — just do it.
What Logging In Looks Like Now
Next time you sign into Gmail on a new device:
Enter email → enter password → Google asks for verification code
Open your authenticator app, find the Gmail entry, type in the 6 digits
You're in
On devices you use regularly, you can check "Don't ask again on this device" and Google will trust that device for 30 days without asking for the code again.
"But What If I Lose My Phone?"
This is the question everyone asks, and it's a good one. Here's the honest answer:
If you saved your backup codes, you're fine. Use one of them to log in, then set up 2FA again on your new phone.
If you didn't save your backup codes — this is why I told you not to skip Step 9. Google does have an account recovery process, but it can take days and isn't always guaranteed. Save the codes.
One More Thing — Your Gmail Protects Everything
Gmail is the account that password reset emails go to. Which means if someone controls your Gmail, they can reset the password on almost every other account you have.
Now that Gmail is protected, consider enabling 2FA on a few other high-value accounts:
📱 Instagram, Facebook — social accounts get targeted constantly
🏦 Banking and payment apps — obvious reasons
🛒 Amazon, PayPal — stored payment methods
💼 Work email and tools — especially if you work remotely
The process is nearly identical on every platform. Look for "Security" in settings, find 2FA or 2-Step Verification, and follow the same steps you just did.
And if you ever need to generate a 2FA code without your phone, 2FA.AC works instantly in any browser — free, private, no signup required.
Frequently Asked Questions
Generate Gmail 2FA Codes Without an App
Enter your Gmail secret key and get your 2FA code instantly — right in your browser.
Generate 2FA Code →